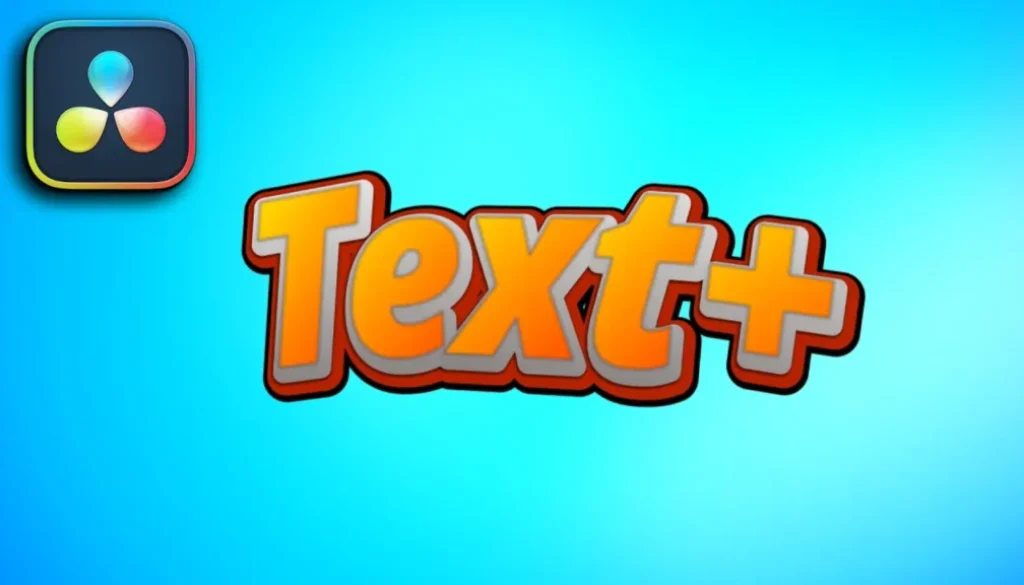
DaVinci Resolve Text+ Deep Dive (What you need to know)
In this article/video I will show you how to use Text+ in DaVinci Resolve. This works on iPad and desktop. We will build a comic style 3D text effect using paths, shading layers, and more.
Contents
- [Video] How to Use Text+ in DaVinci Resolve (iPad & Desktop)
- Text+ vs Basic Title in DaVinci Resolve
- How to Find Text+ in the Cut Page and Edit Page
- How to Change Font, Size, and Tracking in Text+
- How to Use the Write-On Effect in Text+
- How to Use Tab Spacing in Text+
- How to Align Text to a Path in Text+ (Layout Tab)
- How to Use the Fusion Overlay with Text+
- How to Create a Comic Style 3D Text Effect with Shading in Text+
- Using Pre-Built Fusion Titles as Starting Points
- If you want to host your own Online Course use CC360
[Video] How to Use Text+ in DaVinci Resolve (iPad & Desktop)
Text+ vs Basic Title in DaVinci Resolve
Both text types are available in the Cut Page under the Titles tab and in the Edit Page under the Effects tab. You can do a lot with a basic title like changing colors, adding a drop shadow, or a background. But Text+ gives you more power.
The big difference is that Text+ has additional tabs: Layout, Transform, Shading, Image, and Settings. Text+ is actually a Fusion title under the hood, but you do not have to go into the Fusion Page to use it. One major advantage of Text+ is that it supports custom fonts. If you installed a font on your Mac, Windows, or iPad, you can only use it with Text+. The basic title only supports the default fonts that come with DaVinci Resolve.
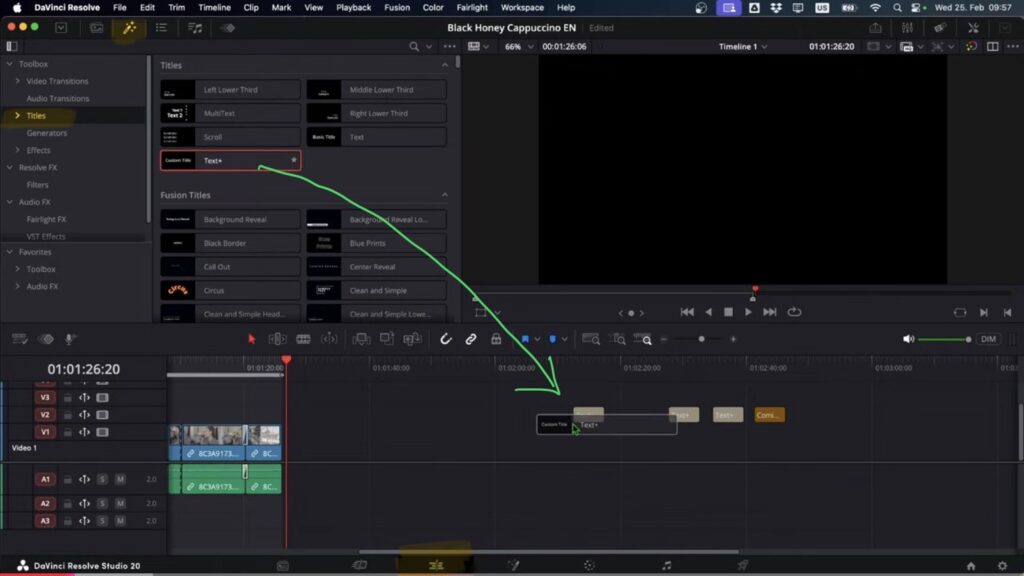
How to Find Text+ in the Cut Page and Edit Page
In the Cut Page you have separate tabs for Transitions, Titles, and Effects. You can find Text+ under the Titles tab. In the Edit Page, everything is combined in one Effects tab. On the left side you will see a menu with Tools, Video Transitions, Titles, Resolve Effects, and Audio Effects. Click on Titles and you will see both the Basic Title and Text+. Simply drag and drop Text+ onto your timeline.
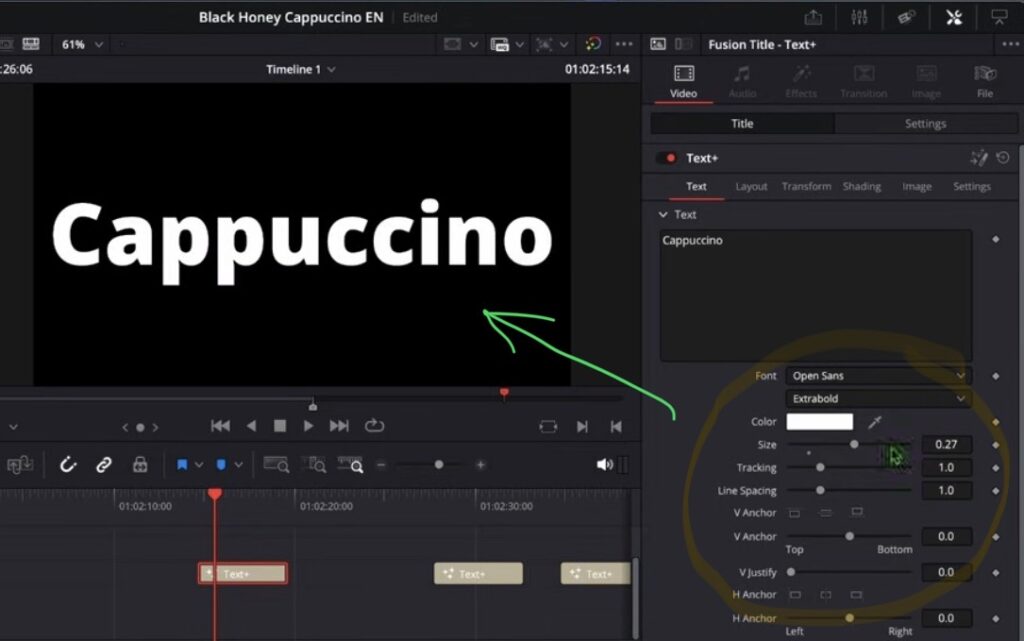
How to Change Font, Size, and Tracking in Text+
Select your Text+ clip on the timeline and open the Inspector. Here you can type your text, change the font, and set the weight (for example Extra Bold). You can also change the size. For our example we set it to 0.27 to get big bold lettering.
Below the font settings you will find Tracking to adjust the spacing between letters. If you have multiple lines, you can change the Line Spacing as well. To reset any value, simply double click on the parameter name.
You can also change the color by clicking on the color swatch. Then there is the V Anchor to control vertical alignment (top, middle, or bottom of the text line) and the H Anchor to control horizontal alignment (left, center, or right). The Direction setting lets you switch between horizontal and vertical text.
How to Use the Write-On Effect in Text+
The Write-On feature lets you create a simple letter-by-letter animation without any complex keyframing. Move your playhead to the beginning of the clip and set the Write-On start value to 0. Then click the diamond icon to set a keyframe. Move the playhead to the end of the clip and drag the Write-On slider all the way to the right. Now when you play back the clip, the text will appear letter by letter.
If the animation is too slow, you can shorten the clip to speed it up. To remove the animation, double click on the Write-On parameter to reset the keyframes.
How to Use Tab Spacing in Text+
If you use the Tab key in your text, you can control the position of each tab stop under Tab Spacing in the Inspector. Click on Tab 1 to select it and change its position. Do the same for Tab 2, Tab 3, and so on. You can define up to eight different tab positions. This is useful if you want to create formatted lists or aligned text layouts directly inside Text+.
How to Align Text to a Path in Text+ (Layout Tab)
This is where things get really interesting. Go to the Layout tab and change the type from Point to Path. Important: there is a known bug in DaVinci Resolve right now. Make sure you disable the Fusion Overlay before you switch from Point to Path. After you switch to Path, you can then activate the Fusion Overlay.
With the Fusion Overlay active, click in the viewer to create points for your path. Click once for the first point and click again for the second point. You now have a line that the text will follow. You can adjust the curve by dragging the handles on each point. You can also move the entire path around in the viewer.
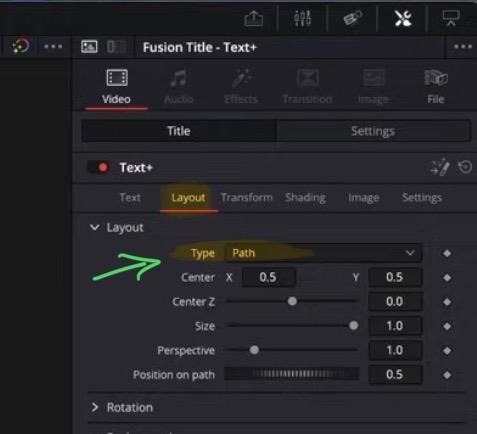
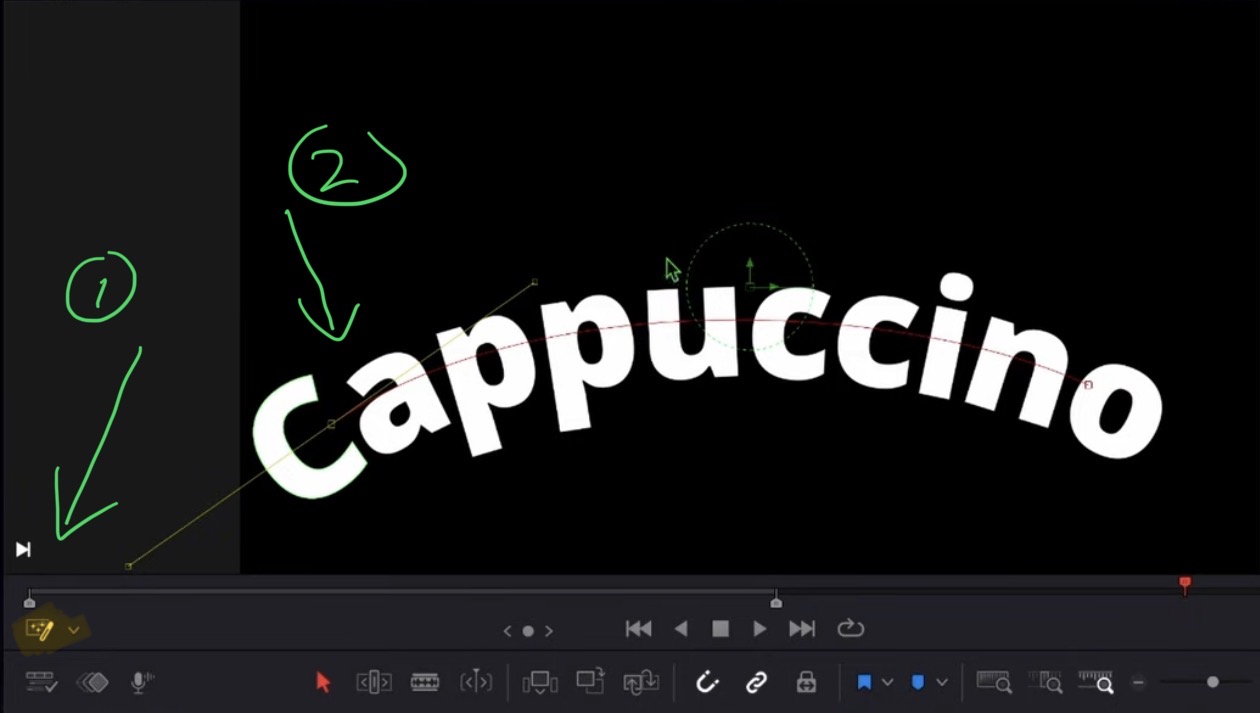
When your path is done and you want to stop adding new points, right click in the viewer, go to Template Path, and select Done. Now you can no longer accidentally add new points and you can freely move things around.
If the bug prevents you from creating a path in the viewer, you can also go to the Fusion Page. As long as your clip is still selected and the Layout tab is set to Path, the Fusion Page will show the same layout view. You can create your path points there and then come back to the Edit Page.
Under the Layout tab you can also adjust the Rotation. For example, use the Y-axis rotation to give the text a 3D perspective effect.
How to Use the Fusion Overlay with Text+
When you activate the Fusion Overlay on a Text+ clip, you get some extra powers. You can move the text around directly in the viewer. You can click inside the text and start typing in the viewer. And if you right click and go to Template and select Allow Manual Positioning, each letter will get its own control point. You can then drag individual letters wherever you want. This is great for creating custom text layouts.
How to Create a Comic Style 3D Text Effect with Shading in Text+
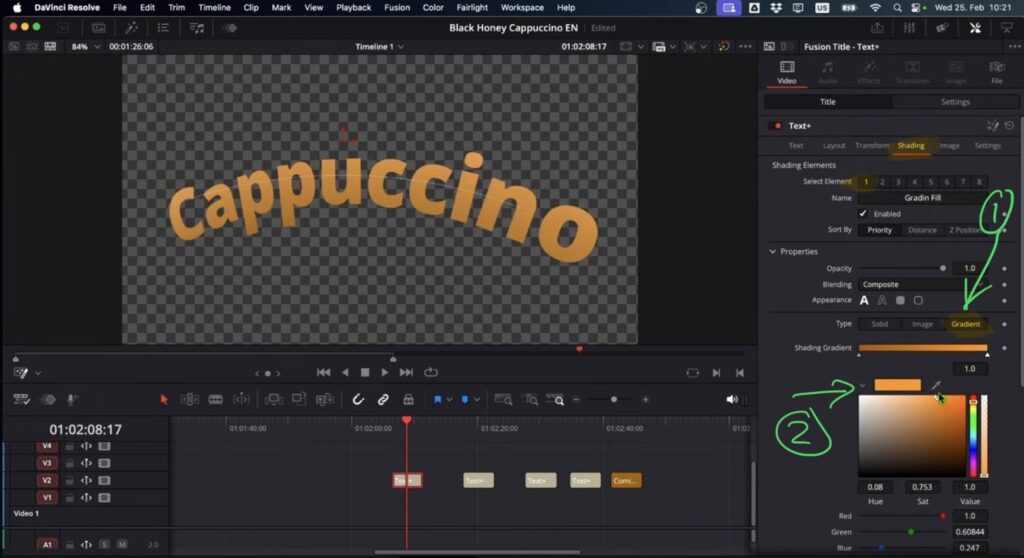
The Shading tab is the most powerful feature of Text+. Here you can stack multiple shading layers on top of each other to build complex text effects. By default, Text+ already comes with a few shading layers (some enabled, some disabled). You can activate or deactivate each layer and customize them individually.
For our comic style 3D effect, we will build six shading layers:
Layer 1: Gradient Fill. On the first shading layer, change the color type from Solid to Gradient. Set the first color to a brown tone and the second color to a brighter orange. Change the Mapping from Character to Word so the gradient applies across the whole word instead of each individual letter.
Tip: Watch the Video to see all the steps and settings regarding the 6 Shading Layer Steps. This will explain more than these images can.
Layer 2: Shadow Outline. Enable the second layer. Set the appearance to Outline. Change the thickness to around 0.055 for a thin line. Set the color to a dark brown. Enable Outside Only and Clean Intersections to keep everything clean. Add some softness (X: 1.1, Y: 1.2) and adjust the position to 8.6.
Layer 3: Depth. Enable the third layer and rename it to Depth. This creates the white 3D depth lines. Change the appearance to the fill mode and set a bright gradient color. This layer gives the text its 3D look by creating visible depth behind the main text.
Layer 4: Red Outline. Enable the fourth layer. Set the appearance to Outline and increase the thickness to around 0.89. Change the color to red. This creates a bold red border around the depth layer.
Layer 5: Black Outline. Enable the fifth layer. Again set the appearance to Outline and change the color to black. This adds the final outer border to complete the comic look.
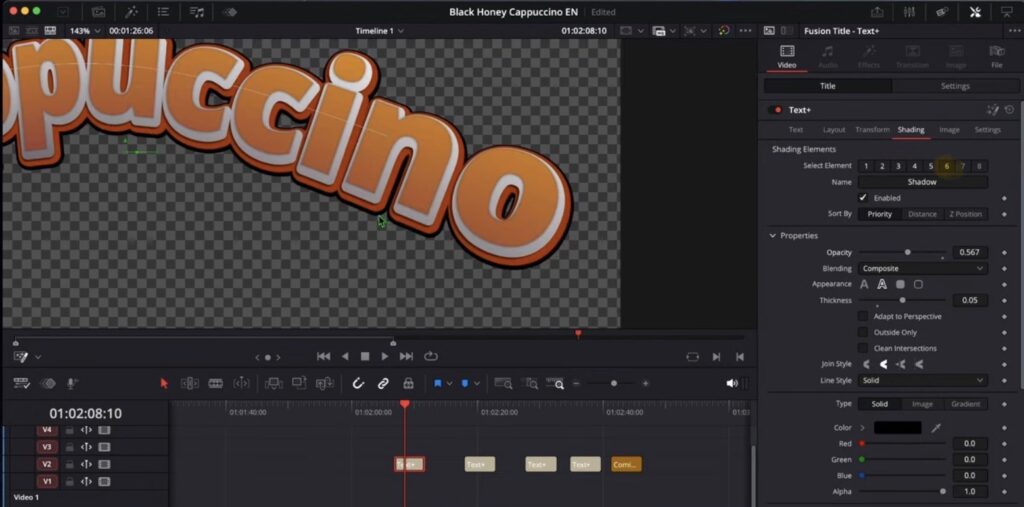
Layer 6: Shadow. Enable the sixth layer for the shadow. Lower the transparency so the shadow is not a hard edge. Set the thickness to 0.05 and use a black color. Add softness (X: 1.1, Y: 0.6) and fine-tune the position (around 5.5) and offset (X: 0.08, Y: 0.18) so the shadow falls between the depth and the red outline layers.
Using Pre-Built Fusion Titles as Starting Points
You do not have to build everything from scratch. DaVinci Resolve comes with built-in Fusion titles that already use Text+ under the hood. For example, the “Sample” template in the title library is a fully styled Fusion title. If you select it and look at the Shading tab, you will see that it uses the same layered shading approach we just learned. Now that you understand how these layers work, you can take any pre-built Fusion title and customize it to your liking.
If you want to host your own Online Course use CC360
I really believe, that CC360 is the best Platform to host your own Online Course currently on the market. And each week they introduce new features. Amazing. Check it out here.
If you want to learn more about DVR for Desktop check out my MasterClass: From Beginner to Pro.
Read Next
• How COPY Color Grade to MULTIPLE Clips in DaVinci Resolve iPad
• DO THIS to make DaVinci Resolve FASTER! (Instead of rage smashing your iPad)
• How To Delete Cache Files in DaVinci Resolve iPad
• How To Color Correct iPhone Footage in DaVinci Resolve iPad
• Easy Sync Audio & Video in DaVinci Resolve iPad