How To Add LUTs in DaVinci Resolve iPad!
In this Article i will show you everything you need to know about working with LUTs in DaVinci Resolve for the iPad. Where to find them. How To Add them and even how to create your own LUTs using DaVinci Resolve for the iPad. Have fun.
Pro Tip: Make your Videos Cinematic (and save a tone of time) with our Orange & Teal LUT’s Pack. (Btw. All DaVinci Resolve iPad MasterClass Students get the Orange & Teal LUTs Pack as a Free Bonus + all the other Packs aswell)

Contents
- [Video] How To Add LUTs in DaVinci Resolve iPad!
- What is a LUT (Lookup Table)
- Different type of LUTs
- How To Add LUTs in DaVinci Resolve iPad
- How To Import LUTs to DaVinci Resolve iPad
- How To create LUTs in DaVinci Resolve iPad
- Important: Always place your LUTs on the LAST Node
- BONUS: All DaVinci Resolve iPad Masterclass Students get the Orange & Teal LUTs Pack for FREE!
[Video] How To Add LUTs in DaVinci Resolve iPad!
What is a LUT (Lookup Table)
LUT (Lookup Table) is a term used to describe a predetermined array of numbers that provide a shortcut for a specific computation. In the context of color grading, a LUT transforms color input values (camera) to your desired output values (final footage).
In short: LUTs can be directly applied to your footage. This makes the grading process much faster, and specific LUTs can transform footage to look like your favorite films and shows.
Different type of LUTs
Not every LUT works on every footage. For example i could have a LUT that is designed to color correct Canon Log Footage. No stylisation to Color Grading, simply bringing all the colours back to normal. If i apply that LUT to a already colour corrected footage it will look terrible.
Or the same could be the other way around. I have a Orange & Teal LUT that only does Color Grading and stylises my footage to get the famous Hollywood Orange & Teal Look. If i apply that LUT to a LOG Footage that is not yet color corrected, it will not look great.
And to make it even more complicated. You can also mix Correction and Grading in one LUT. So i could have a LUT that does Color Correction of my LOG profile and also Color Grading.
So it’s always good to know for what Footage the LUT is intended to be.
How To Add LUTs in DaVinci Resolve iPad
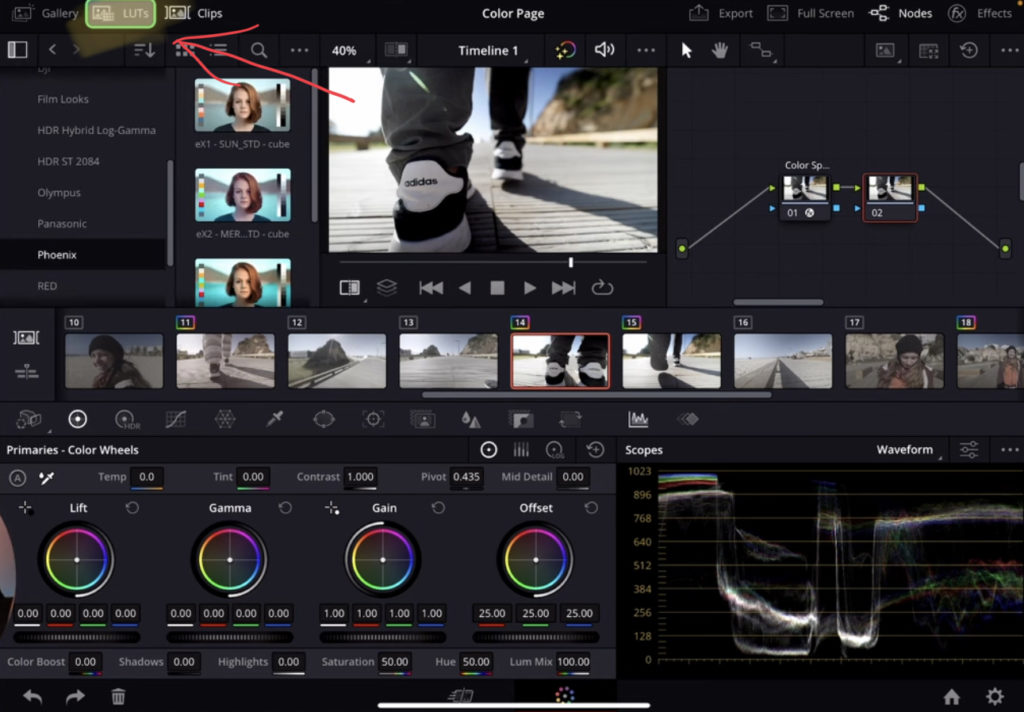
You will find the LUTs tab on the top left in the Color Page of DaVinci Resolve on the iPad. DaVinci already comes with a catalog of default LUTs that you can use.
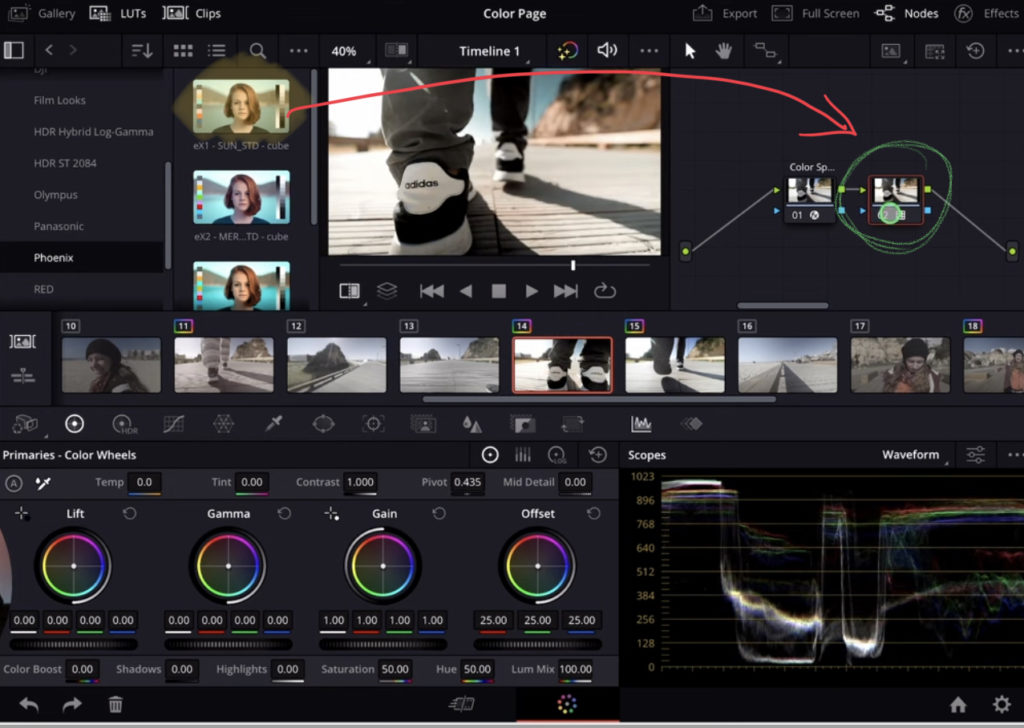
Create a new Node (Option + S) and simply drag and Drop the LUT onto the Note. Before you do that you can also preview your LUTs by simply hovering with the pointer over the LUT.
How To Import LUTs to DaVinci Resolve iPad
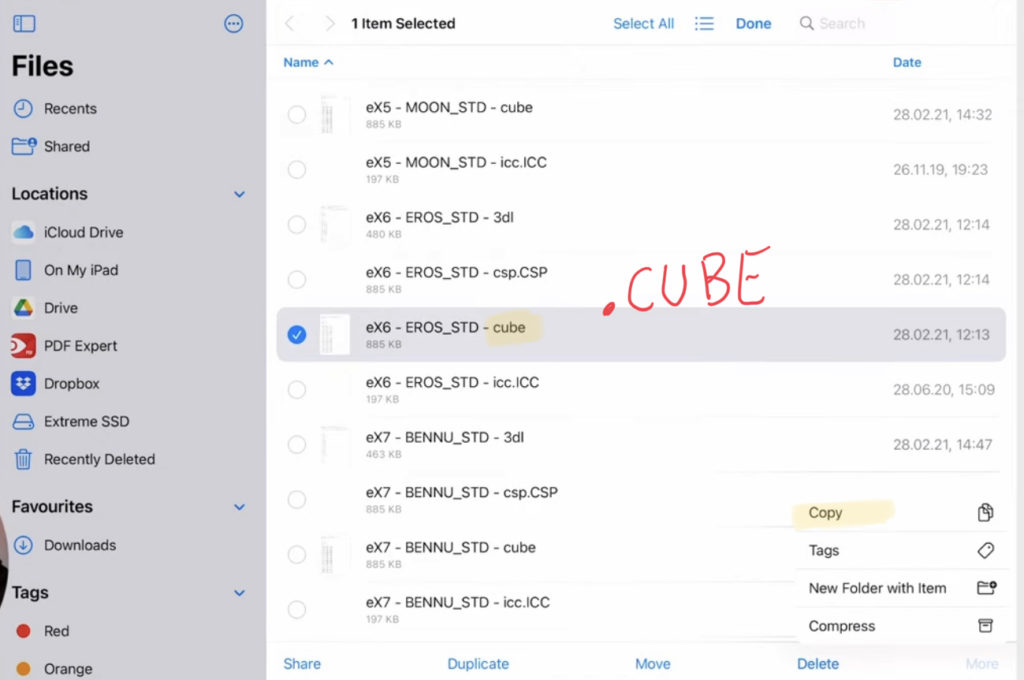
DaVinci Resolve on the iPad works with .CUBE Files. In my example i copy the Cube files from our Orange & Teal LUTs pack and place them into the following location inside of the DaVinci Resolve Folder in the Files App:
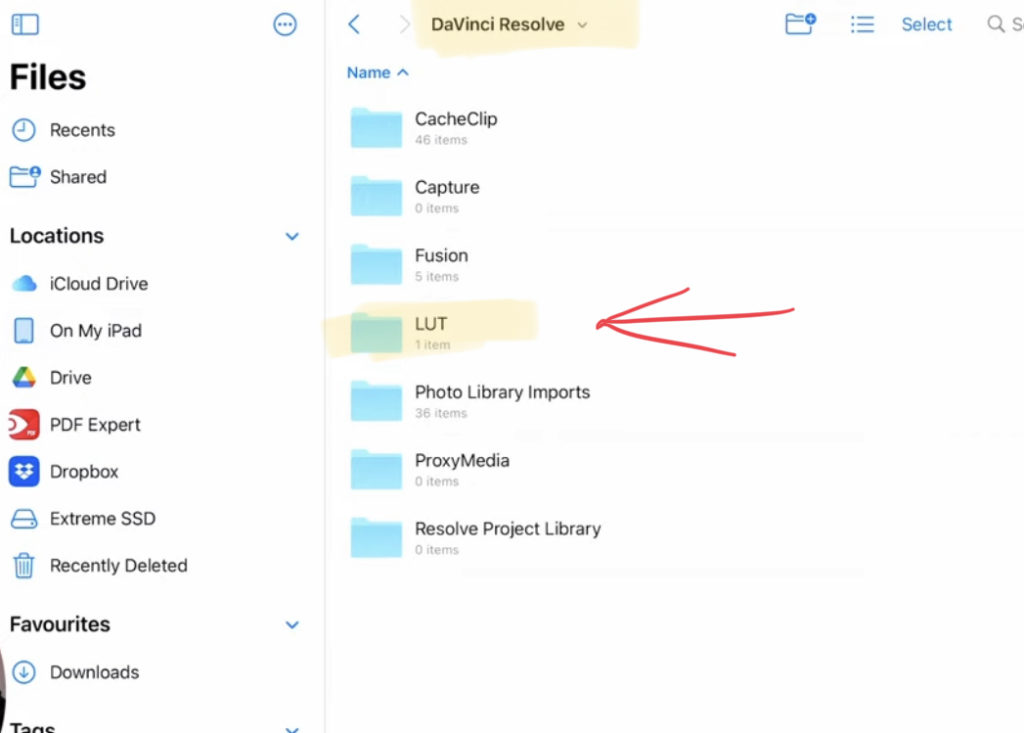
Inside of the LUT Folder you can also choose to create your own Folder and copy the LUTs in there. But it also works if you leave them just inside the top level of the LUTs folder. When you create Folders you will see these Folders inside of DaVinci Resolve aswell. So i recommend creating sub-folders.
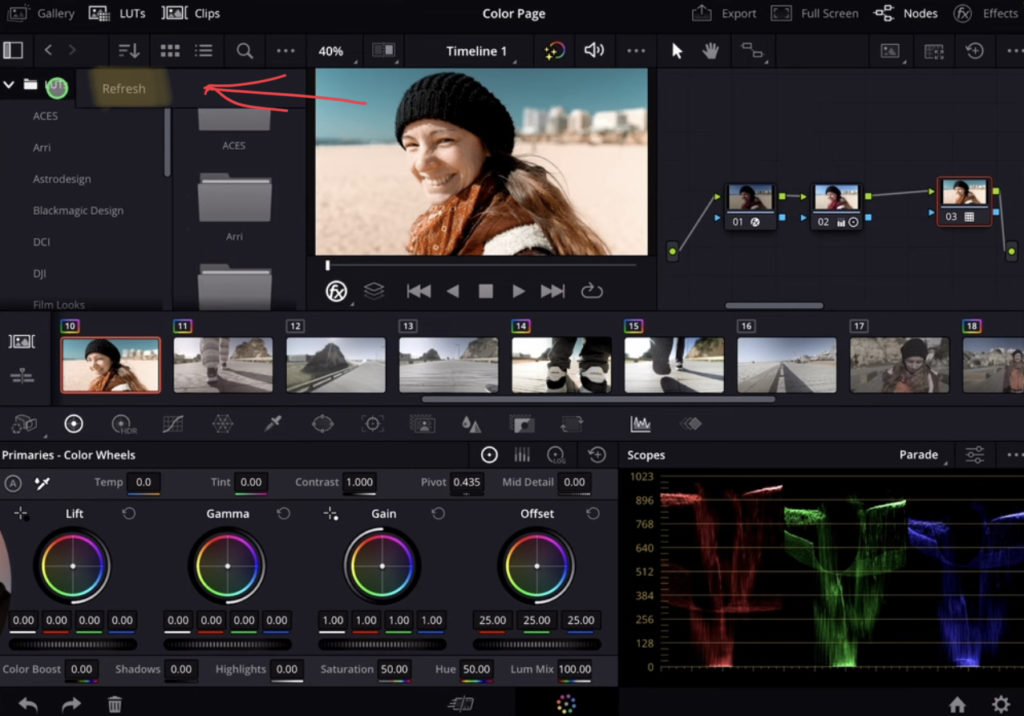
You don’t even have to restart DaVinci Resolve on iPad. Go back to DaVinci and right click on the LUTs folder and hit “Refresh”. Now the new LUTs will be visible.
How To create LUTs in DaVinci Resolve iPad
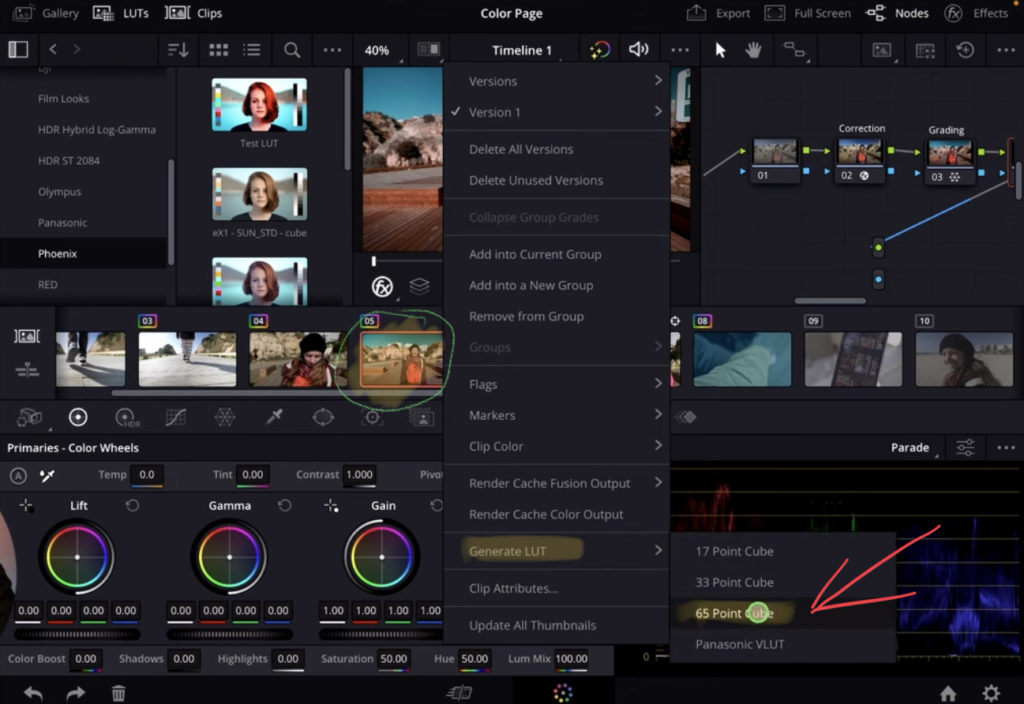
You can also create your own LUTs using DaVinci Resolve for the iPad. Select the Clip where you want to create the LUT from. Right Click and go to Generate LUT and select “65 Point Cube”.
Important: Always place your LUTs on the LAST Node
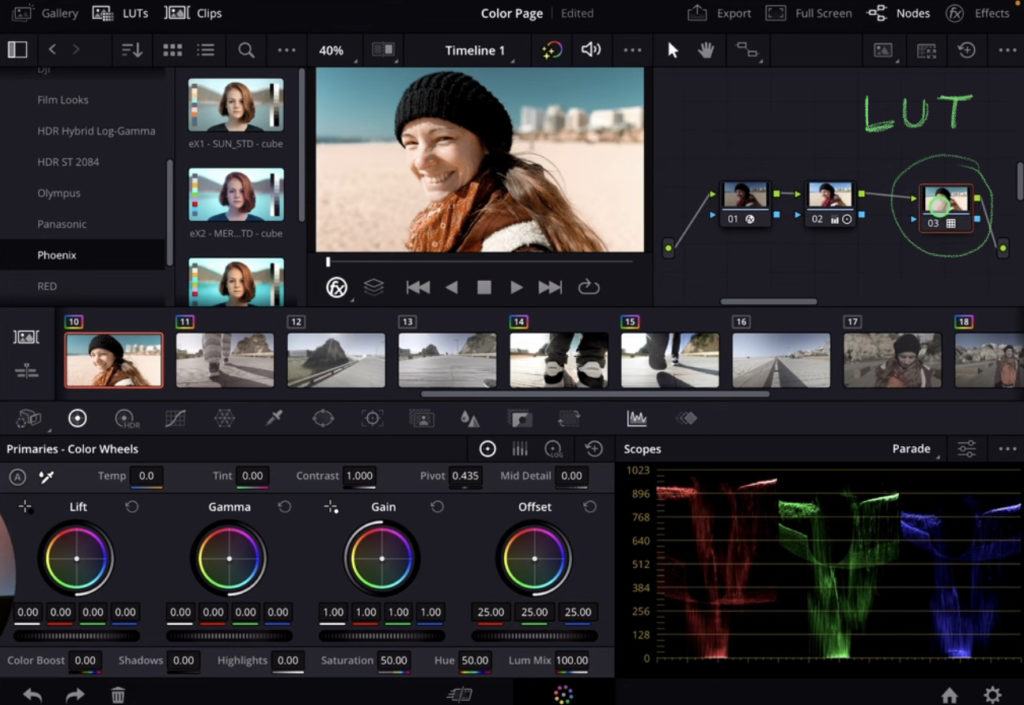
When you place a LUT it will decrease the Color Information of your Footage. That means if you want to change something with that data after you already placed a LUT on a Node you simply don’t even have that information anymore. So this is why first do all the changes you want to do to your Footage and always place the LUTs on the last node.
BONUS: All DaVinci Resolve iPad Masterclass Students get the Orange & Teal LUTs Pack for FREE!
You can either get the Transition Pack separate here: Seamless Transition Pack for DaVinci Resolve iPad. Or all of our DaVinci Resolve iPad Packs are a FREE Bonus for the DaVinci Resolve iPad Masterclass Students.
Check It Out here DaVinci Resolve iPad MasterClass: From Beginner To Pro.

Read Next
• How COPY Color Grade to MULTIPLE Clips in DaVinci Resolve iPad
• DO THIS to make DaVinci Resolve FASTER! (Instead of rage smashing your iPad)
• How To Delete Cache Files in DaVinci Resolve iPad
• How To Color Correct iPhone Footage in DaVinci Resolve iPad
• Easy Sync Audio & Video in DaVinci Resolve iPad


